


Integrating SAP S/4HANA with SAP Build Work Zone, standard edition, Manually
- Sergio Cannelli

- Oct 17, 2024
- 9 min read
Overview
A secure and stable connection with SAP BTP is required to consume data from an on-premise back-end system like SAP S/4HANA. This can be achieved with Cloud Connector, which is a component that is installed on a Windows or Linux machine in the on-premise landscape.
In this lesson, you will learn where to download Cloud Connector and how to install and configure the connectivity between SAP BTP and SAP S/4HANA.
Prerequisites
You will require the following access / authorizations:
Admin access to the system/server you’re going to install the Cloud Connector on
Personal user with admin authorizations on the SAP S/4HANA system
Initial Setup
Download and Install Cloud Connector
The Cloud Connector can be downloaded from :
this link https://tools.hana.ondemand.com/#cloud
If Java is not installed on the server, it is also necessary to download and install Java.

You can download the zip archive (Portable) for development use cases or the MSI installer for productive usage for Windows. It is recommended to use the MSI installer as this will install Cloud Connector as a Service on the server.
We will use the Windows version in this tutorial, but Linux and Mac versions are also available, as shown in the figure.
Once downloaded, run the MSI installer package and follow the on-screen installation guide. The Cloud Connector starts automatically once the installation is finished.
Initial Configuration for Subaccount
Watch the following video to learn how to perform the initial configuration for the subaccount:
The following parameters are mentioned in the video and are included here for your reference:
Credentials for initial login:
User Name: Administrator
Initial Password: manage
Mandatory fields:
Region: Select subaccount region from the value help (this can be found on the subaccount overview page under Region / within the API Endpoint URL)
Subaccount: The Subaccount ID (this can be found on the subaccount overview page under Subaccount ID)
Login E-Mail: E-mail address of the user the subaccount was created with / admin user
Password: Password of the user that the subaccount was created with / admin user.
Result

This concludes the initial installation and configuration of the Cloud Connector. Next, you will connect the SAP BTP subaccount and an on-premise system.
Create Cloud to On-Premise Connection
o make an on-premise resource available on SAP BTP, a mapping between the Cloud Connector and the on-premise system must be created.
A system mapping with the information of the SAP S/4HANA system must be created in the Cloud To On-Premise tab. After that, you can decide which resources of the SAP S/4HANA system should be available via the Cloud Connector by adding paths to specific resources. In this example, you will use the "wildcard" path ("/") that enables all resources. With this, the users will be able to access all the resources they are allowed to, based on their assigned roles.
Exposing Content from SAP S/4HANA
Overview
Now that a basic connection between SAP S/4HANA and the SAP BTP subaccount has been established via the Cloud Connector, the next step to federate content from SAP S/4HANA can be started.
The goal is to make the existing business roles and content (catalogs, groups, apps, spaces & pages) available within SAP Build Work Zone, standard edition. Once the content is imported, it can be added to a launchpad site within the service and accessed via SAP Mobile Start.
Prerequisites
The technical settings that are described in the following sections must be performed in SAP S/4HANA as a prerequisite for content exposure.
Add FLP Configuration Parameter
The parameter EXPOSURE_SYSTEM_ALIASES_MODE defines how to handle system aliases during content exposure. In an embedded deployment of the SAP Fiori front-end server, all apps run on the same server. Therefore, system aliases can be cleared during exposure. In contrast to a hub deployment, they might come from different back-end systems and each back-end system may have several aliases. In this case, you would need to manually map these aliases to specific runtime destinations when creating the content provider in one of the next lessons.
Go to transaction /N/UI2/FLP_SYS_CONF and add an additional FLP configuration parameter. Click New Entries.
Enter the following values:
FLP Property ID | Category | Type | Property Value |
EXPOSURE_SYSTEM_ALIASES_MODE | Automatically filled | Automatically filled | CLEAR |
Save the entry and select a transport request when prompted.
Clickjacking Protection Activation
Because the apps are integrated into SAP Build Work Zone, standard edition using iFrames, you need protect your system against clickjacking (or UI redressing) attacks by enabling the clickjacking protection. For this, the Unified Connectivity Framework (UCON Framework) is used to optimize the protection of your RFC and HTTP(S) communication against unauthorized access.
Go to transaction UCONCOCKPIT and select the HTTP Allowlist Scenario from the list.
Then, in the More menu, select HTTP Whitelist → Setup.
Select both options in the setup menu and save it.
Note
You can see that the entry Clickjacking Framing Protection is added in logging mode, which means that the connections are just logged but not checked. In production, it is recommended to set the Mode to Active Check and to maintain the patterns of SAP Build Work Zone, standard edition host.
To do that, double-click the row Clickjacking Framing Protection.
Next, the blocked and allowed connections can be viewed and edited. You can add the host of your SAP Build Work Zone, standard edition to the allowlist here.
It should look like this: "<subdomain>.launchpad.cfapps.eu10.hana.ondemand.com". The subdomain of the respective SAP BTP subaccount can be found in the BTP cockpit.
Exposure Service Check
To make sure all prerequisites for content exposure are met, check if the service /sap/bc/ui2/cdm3 is activated in the SAP S/4HANA system.
Go to transaction SICF and find the cmd3 service.
Double-click on the list entry, and ensure that it is set to active and that the Use All Logon Procedures is ticked in the Logon Data tab.
Preparation of Exposing User
To receive the exposed content from the cdm3 service later, a user with access to the specific endpoint is required. It is usually a good practice to create a dedicated service user whose credentials can later be used within the design-time destination. As a prerequisite, the user requires access to the "/sap/bc/ui2/cdm3/entities" endpoint. This access should be granted by assigning the SAP_FLP_ADMIN or SAP_FLP_EXP_USER role.
To do this, access the user maintenance (transaction SU01) and make sure that one of the mentioned standard roles (SAP_FLP_ADMIN or SAP_FLP_EXP_USER ) or a custom role that holds the proper authorization (the required Authorization Object is "/UI2/FREPO") is assigned.
In addition to that, navigate to the Parameters tab and ensure that the parameter /UI2/PAGE_CACHE_OFF does not show up there, as it will disturb the process. If it does, remove it.
With that, the SAP S/4HANA system is now ready for content exposure.
Content Exposure
Now that all prerequisites are met, you can select and expose SAP S/4HANA content. Go to transaction /N/UI2/CDM3_EXP_SCOPE.Click the multiple selection icon.
Click the multiple selection icon.
Select the business roles that you want to expose. In this example, we will use the SAP_BR_Purchaser business role. Then, copy the list to your selection by pressing F8 or clicking the copy button.
Click Save Selected Roles in the header bar, and then click Expose.
As a result, the business content is exposed from SAP S/4HANA as a json file and will be accessible via the service path /sap/bc/ui2/cdm3/entities.
With the Preview and View Exposed Content buttons, you can have a more comprehensive view of the exposed content.
Preparing SAP BTP Subaccount
Creation of SAP BTP Destinations
To connect to the SAP S/4HANA system, import the content, and access business data, two destinations need to be created in the SAP Business Technology Platform subaccount:
Design-time destination – used by SAP Build Work Zone, standard edition to fetch the exposed content from the SAP S/4HANA system
Runtime destination – used during runtime, that is, whenever a user is working on the launchpad and accesses back-end data
Log on to SAP BTP subaccount, navigate to Destinations, and click Create Destination.
Design-Time Destination Creation
Clicking New Destination opens a destination template – enter the following information for the Design-Time destination. For name, use the SAP S/4HANA system ID with the suffix "dt" for Design-Time, for example, s4hdt. As the authentication method, use "BasicAuthentication" and enter the credentials of the exposing user.
Note
The destination name must be lower case and must not contain the underscore character (_).
Destination Configuration
Name | For example, s4hdt |
Type | HTTP |
Description | For example, S4 Design Time Destination |
URL | https://<hostname>:<port>/sap/bc/ui2/cdm3/entities |
Proxy Type | OnPremise |
Authentication | BasicAuthentication |
Location ID | <Location ID defined in the Cloud Connector> |
User | SAP S/4HANA User |
Password | Password of the above user |
Additional Properties
sap-client | <SAP S/4HANA client> For example, 100 |
Note
Save the entered information.
Runtime Destination Creation
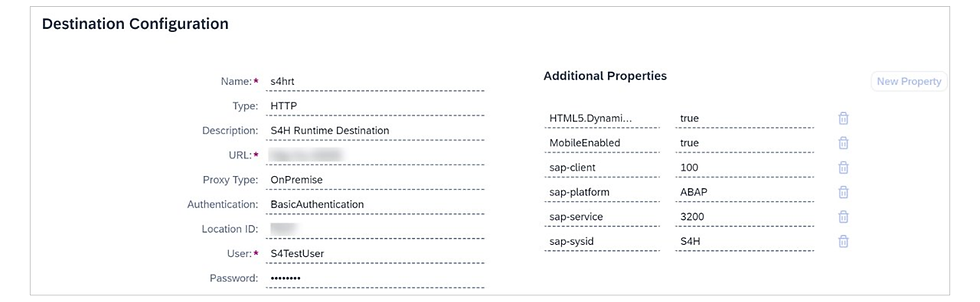
Next, the runtime destination will be created. This destination is required to access the business data of the connected SAP S/4HANA system. It does point to the base host, so apps that are requesting data can add to the path to request the data from specific endpoints.
For the name, use the SAP S/4HANA system ID and the suffix "rt" for runtime, for example, s4hrt.
Similar to the Design-Time destination, use the BasicAuthentication for now. Enter the credentials of an SAP S/4HANA user that can be used to perform a first test for the business content. This could either be your own or a dedicated test user that holds authorizations to the business content in the exposed roles.
In the next lesson, the authentication method will be changed from BasicAuthentication to PrincipalPropagation to enable a connection based on the user logged into SAP Build Work Zone, standard edition.
For the other input fields and additional parameters, use the guidance of the following table:
Destination Configuration
Name | For example, s4hrt |
Type | HTTP |
Description | For example, S4H Runtime Destination |
Proxy Type | OnPremise |
URL | https://< hostname>:<port> |
Authentication | Basic Authentication |
Location ID | <Location ID defined in the Cloud Connector> |
User | <SAP S/4HANA user> |
Password | <Password of respective user> |
Additional Properties
HTML5.DynamicDestination | true |
MobileEnabled | true |
sap-client | <client> for example, 100 |
sap-platform | ABAP |
sap-service | 32<service number> for example, 3200 |
sap-sysid | <sysID> for example, S4H |
Save the entered information.
Note
More information on the parameters is available in the help documentation.
Importing Content to SAP Build Work Zone, standard edition
After completing this lesson, you will be able to use SAP S/4HANA business content on SAP BTP
Enable SAP Build Work Zone, standard edition
Prerequisites
SAP BTP Global account with SAP Build Work Zone, standard edition entitlement
Admin access for this subaccount
Available Plans
SAP Build Work Zone, standard edition offers two types of standard plans and it is important to understand the difference between them, and to understand which scenario is relevant for each one. For the setup with SAP Mobile Start, access to the SAP Build Work Zone, standard edition application is required. Either the free (Application) or standard (Application) plan are applicable.
Note
The free plan comes with specific limitations, such as limited user count. For more information, see Using an Account with a Free Service Plan.
For more information, see available plans
Add Entitlement to SAP BTP Subaccount
Create SAP Build Work Zone, standard edition Subscription on SAP BTP Subaccount
Within the Site Manager, there are three main pages available:
Page | Description |
Site Directory | Here you can create and maintain different sites and their settings. |
Content Manager | This is where the content is maintained; for example, you can see federated content from the SAP S/4HANA system or you can manually create apps (tiles), roles, Groups and catalogs. |
Channel Manager | Content Channels are used to import content from different source systems; for example, SAP S/4HANA. In this tab, you can create and maintain the Content Channels. |
Setting Up Cloud Connector for Principal Propagation
Overview
The initial setup of Cloud Connector can be used to leverage the connection between the SAP BTP subaccount and the SAP S/4HANA system. Currently however, all users logging into the SAP Build Work Zone, standard edition will see the same data corresponding to the fixed user credentials that were used to access back-end data via the Runtime Destination.
The setup of principal propagation is required to grant end-users access to their own data and to ensure they can only access data based on their authorizations in the SAP S/4HANA system. To achieve this, the user information from SAP BTP will be propagated to the SAP S/4HANA system through the Cloud Connector. Access to the requested data is only granted if the user record between SAP BTP and SAP S/4HANA can be mapped based on a specified attribute (for example, E-Mail).
Prerequisite
The user record on SAP BTP and SAP S/4HANA needs to have this specified attribute maintained with the same value. For example, for the e-mail address, you must make sure the SAP S/4HANA user has the "E-Mail Address" attribute in SU01 filled with the same address the SAP BTP user uses to log on.
Generate Cloud Connector Certificates
As a first step for the setup of principal propagation, we must prepare different certificates to establish trust between the Cloud Connector and SAP S/4HANA. In the latest versions of the Cloud Connector, it is possible to generate self-signed certificates, which are sufficient for doing a Proof of Concept. However, for a productive scenario, it is highly recommended to use signed certificates from a trusted Certification Authority.
In total, three different certificates are required:
System certificate
CA certificate
User certificate
Principal Propagation Settings
The following video shows the remaining steps to get principal propagation enabled for your connection:
Syncing Cloud Trust with IdP
Configuring the mapping to the backend system to use X.509 certificate as principal type
Switching the Authentication from BasicAuthentication to PrincipalPropagation in the runtime destination


Comments